Spellbinders: Celebrate the Season!

Hey Friends!

Thanks so much for stopping by today!

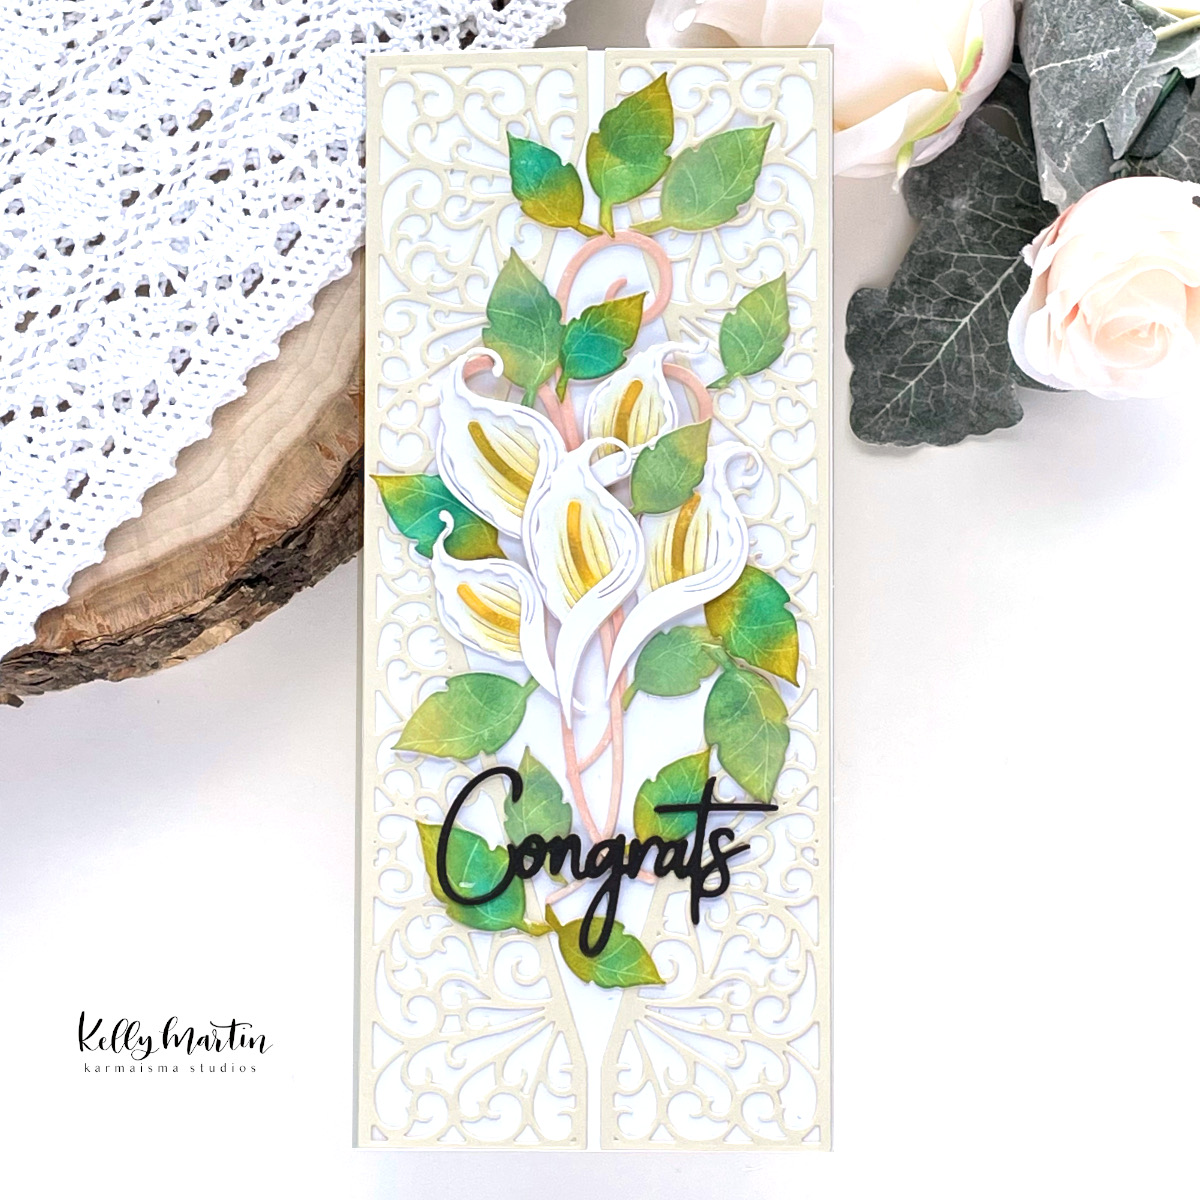
My project for today is showcasing the Celebrate the Season release from Spellbinders. I used the Stylish Merry Christmas Etched Die set from the collection as well as the More Holiday Decorations Etched Die set.

This card was pretty easy to put together as it was only die cutting involved!

I cut and scored a kraft card base and set it aside.

I then used the holiday decorations die and cut both the bulb and the ends several times from white cardstock. I colored them with copic markers and then adhered the front bulb piece to the base bulb piece. After I cut a bunch of those out, I repeated the same process with the bulb ends, the curly light strand, and the ornament/jingle bell die.

I glued down all the light bulb and ornament/jingle bell images to the curly strand and then glued all of those assembled decorative strands down to my kraft card base.

I used the Stylish Merry Christmas die cut the shadow piece from vellum and the actual text pieces from gold shimmer cardstock. I glued the letters in place on to the vellum shadow and then applied glue to the back of the shadow piece where the letters were so that the glue would be hidden by the letters. Once that glue was applied, I pressed that finished sentiment piece down to the card to finish everything off!

Thanks again for joining me today and I hope you'll check out this holiday collection - there are so many fun elements in the collection!

Kelly

Affiliate and Licensing Disclosure

Thank you so much for visiting my blog! Papercrafting has been such a wonderful part of my life for many years, and I have so many companies to thank for keeping that love alive!

I am an affiliate with multiple papercrafting companies and any time you shop using my affiliate link, I earn a small commission. Never fear - this commission is NOT built into the price of the items you are buying. You pay the same price whether I earn a commission or not. :) Earning this very small commission just keeps me from having to take out a second mortgage to support my crafting addictions! Those links are listed at the top of my website's home page.

The companies I support by crafting with their products:

The Greetery
The Stamp Market
Heffy Doodle
Honey Bee Stamps


*Commercial Licenses on file


Spellbinders Birthday Celebration!

 Hello, Everyone!

Today is such a fun day because we're celebrating Spellbinders' 20th Birthday!

Of course I had to do a birthday cake card, and this die set is from the Birthday Celebrations Collection at Spellbinders, and it's called the Topsy Turvy Cake Die


This card was really easy to put together! I just used the basic shapes in the cake die set to cut several background pieces from colored cardstock I had in my scraps, and then I used the inlay dies in the set to create the "cover" pieces for those cake layers. 

I glued the cover pieces to the basic shape pieces and then once all the cake layers were assembled, I glued all the cake layers together for the finished product. 

I used the "Happy Birthday" sentiment stamp from the Lyrical Layered Florals stamp set and the coordinating die to create the sentiment on the front of the cake. Althuogh I only stamped the sentiment once, I used the die to cut several pieces and glued them togeher for a stacked look so that the sentiment wouldn't get lost on that cake!

After I glued the sentiment to the cake, I trimmed down a piece of foiled patterned paper from the Cheerful Occasions paper pad and adhered that on to a cut and scored 4.25 x 5.5 inch card base. Then, to finish off the card, I adhered foam tape to the back of the completed cake, and adhered that to the card base. I love that the foam tape helps the cake pop off the background!

Thanks so much for stopping by today and I hope you'll get a chance to take a look at this new collection from Spellbinders!

Kelly 


Layered Fleur Bouquet Slimlines (Spellbinders)

Hello, crafty friends!

I'm back today with another project, showcasing products from Spelbinders!

Spellbinders recently released a collection from Becca Feeken called the Layered Fleur Bouquet Slimlines Collection


This collection contains several die sets that create different types of flowers, along with some background and decorative dies as well. 

For today's project, I used the Layered Lilies die and the Half Slimline Diamond Etched die. I started by cutting and scoring a slimline card base from white cardstock.

I used the diamond die to make two cuts on cream colored cardstock and created the entire background. I used liquid glue to adhere the two diamond panels down to the card base and then cut the different lily, leaf, and accent pieces pieces several times from white cardstock. I glued the flowers together using liquid glue and then colored them with various Distress Oxide inks and sponge daubers. 


After I glued the floral and accent pieces down to the card base, I used a sentiment from the Simply Perfect Mix & Match Sentiments die set and cut that several times from black cardstock that I had in my scrap drawer. Because the sentiment was very fine, I knew I needed to use several layers glued together in order to make the sentiment pop off the card with enough dimension. 

Thanks so much for stopping by and checking out my project!

Kelly


Supplies Used: Various Distress Oxide Inks (Bundled Sage, Rustic Wilderness, Crushed Olive, Evergreen Bough, Forest Moss, Fossilized Amber). 

White Cardstock

Black Cardstock

Cream Cardstock


A Better World

 Hey Everyone!


I'm over at the Butterfly Reflections Ink Blog with this super fresh and spring-y card today! I hope you'll stop by and take a look!