Showing posts with label Colored Pencils. Show all posts

Honey Bee Stamps Stamptember Collaboration


Happy Sunday, crafty friends!

Thanks for taking a pause out of your day to spend some time with me here on my blog. Today's card is extra fun because it's part of the Simon Says Stamp Stamptember celebration which continues for the entire month! If you're not familiar with this fabulous event, you can read all about it here

Today's collaboration is with Honey Bee Stamps and the stamp set is gorgeous!

I created a simple wreath card today by stamping the leaf and bud images multiple times in a circle pattern on to watercolor paper with Antique Linen Distress Ink. I then watercolored the images with different shades of Distress Ink and then left it to dry.


After the watercolors were all dry, I added details with my Prismacolor Colored pencils. It's always better to start with a light hand and then continue layering on the colors and pencil strokes. I like using colored pencils on top of watercolors or copic markers because it adds a lot of texture!


I stamped a sentiment in the middle with black ink and then trimmed down the watercolored panel, mounted it with a piece of foam, and then glued it down to a cut and scored 4.25 x 5.5 inch kraft-colored card base. 

To put a finishing touch on the card, I added some gems  around the wreath. I don't normally add embellishments like this to cards, but I really like the way it tied the whole card together!


That wraps up the card, but don't forget to hurry on over to Simon Says Stamp to get your hands on this set because there are limited qualities available!

Thanks again for stopping by and happy stamping!

Kelly

Honey Bee Stamps Autumn Blessings Blog Hop!


Welcome, crafty friends!

I'm so glad you're here because I have such a fun card to share with you today!

Honey Bee Stamps is having a fun blog hop today as part of inspiration week to fill your idea files with great ways to use the newest release which you can find here.

I had so much fun creating today's card, so I'll get right to it!


I was so excited when I saw this House Builder Die - it is so unbelievably amazing! It comes with so many pieces and options to customize your house. It can be used to make shaped cards OR the house is also small enough to fit on the front of an A2 (4.25 x 5.5 inch) card.

So really this card was simple to put together from the standpoint that I just cut out the pieces with my die cut machine and then glued them together. These dies are also a fun way to incorporate patterned paper, which is another obsession of mine! And using this die is also a great way to use up scrap paper in your stash because a lot of the elements of the house are pretty small.


Here are a couple tips I picked up along the way with using this die:

1. Ink Blend for Added Dimension

After you cut out your pieces, they can fall a little flat sometimes. So pick up an ink blending tool or a sponge dauber and blend some ink around the edges of the die cut pieces to give them some added dimension! This will help them pop off the base of the house a little better!


2. Add Colored Pencil Details for Added Texture

Using a colored pencil in the same shade as your die cut piece, you can lightly scribble on some lines to your die cut pieces to give them the look of texture. I did that with some of the window pieces to give them the look of wood grain.

3. Use the Photo from the Website for a Guide

Sometimes a large die set like this can be overwhelming and confusing, so utilize the product photos on the website to help you know what function all the pieces are supposed to perform! But the GREAT thing is that these dies are sized and designed so that some of the pieces can pull double duty and serve multiple functions.


For instance, you may notice that the sample photo here from the website does not contain a flower box underneath the two windows on the first floor of the house. And it also contains a nice detail piece over the front door. Well for my card, I used that front door piece as a flower box for the first floor windows instead!

I chose to keep this a shaped card, so I die cut another house panel and then used one of the dies in the set to create a hinge piece and glued one side of the hinge to the top of the under-side of the first decorated house panel. I then glued the other side of the hinge to the top of the other plain house panel to finish things off!

Thanks again for stoping by and be sure to check out all the other stops along the hop today! Honey Bee Stamps is giving away two prize packs valued at $50 to one lucky winner who comments on each stop along the way.

Check out the entire hop here!

Honey Bee Stamps
Channin Pelletier
Carol Hintermeier
Kelly Latevola
Lisa Cisneros
Kelly Martin (you are here!)
Bobbi Lemanski (go here next!)
Jill Hawkins
Galina Filippenko
Alba Castejon (our friend Alba is sharing her project for today's hop on her Instagram account!)


Have a great weekend!!

Kelly

Autumn Blessings - The Greetery New Release

Hey there, friends!

Thanks so much for stopping by and spending some time with me today!

I just had to pop in and share a project I made with the recent release from The Greetery. I have been swooning over these stamps and dies since they first hit the market a few months ago. Betsy has knocked it out of the park over and over again with her designs, and I've had so much fun creating with them!

I also have some tips to share with you along the way, so let's dive in!


When I first saw this stamp set, I was a little intimidated, to be honest! It's a layering set with several layers, but never fear! The stamp set comes with VERY helpful guides and notes actually printed on the packaging, so it takes a lot of the guess work out of the layers!


I highly recommend beginning your project by actually using the die to cut out the wreath piece first. This is definitely a stamp set in which I encourage you to buy the coordinating die - because it makes lining up all the layers in the image a lot easier! I put the die cut wreath in my MISTI and that made lining up the layers a lot easier, too!

And another helpful tip - I think a lot of us are used to cutting away all the connecting pieces of the die without even thinking - but don't cut this one apart! You need both parts to cut the wreath out correctly, so don't separate them! If your machine creates an imprint on your die cut piece from the connecting piece of metal, don't fret - the stamping will cover it up!


I used several different colors of ink to stamp all the layers. The first layer was the leaf layer. Then followed by the wheat layer, mushroom and acorn layers, berries layer, etc. Having mini ink cubes definitely helps because you can ink up smaller areas and that's helpful for inking several different parts on the same layer. 


After I had finished the stamping, I actually added details with my colored pencils - this is an added step which can seem unnecessary but I promise it's worth it! It really makes the finished image come to life!


After all the coloring was finished, I stamped a sentiment on the negative space from the die cut wreath, and then cut and scored a 4.25 x 5.5 inch card base. I glued a piece of patterned paper (trimmed down to 4.25 by 5.5 inches) on to the front of my card base and then pulled together the rest of the card.

I glued down the wreath on to the card and then glued down the negative inside piece with the sentiment on it.

For a finishing touch, I added a three dimensional bow sticker at the top of the wreath that I had in my stash!


Thanks again for stopping by today! If you haven't checked out the new release from The Greetery, you can find it here.

Happy Crafting!

Kelly

Supplies Used in today's project:


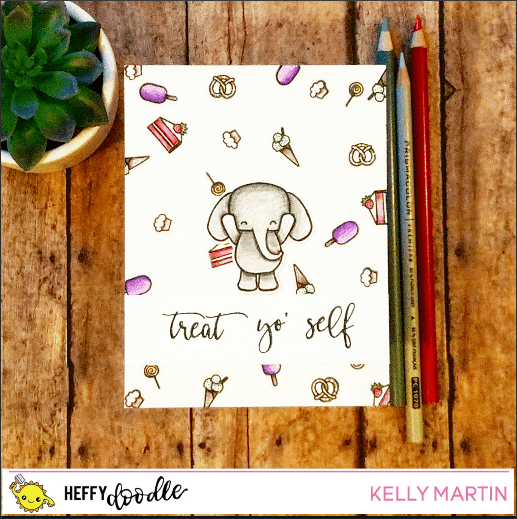
Treat Yo' Self!

Hey There!

My name is Kelly and I'm super excited to be over on the Heffy Doodle blog for my first blog post as a design team member! I was so honored to be invited to be a part of the design team, and I'm excited to see how I'm going to grow in my skills as a crafter while working with these other amazing folks! For a closer look at my work, head here to my instagram account.

Today I'm sharing this fun card full of some of my favorite things--TREATS!!! If you look closely. you'll see that they are mostly sweet treats, with the exception of my all time favorite snack: pretzels!!


I decided to break out my colored pencils since I wanted to color these images as soon as I stamped them, and I didn't want to take the time to heat set the images or wait for them to dry on their own before I started coloring. Colored pencils are the perfect medium to use when you're wanting to stamp and then color immediately because you won't run the risk of the black ink bleeding into the rest of your images if you were to use markers or water coloring mediums.

I used several of the small treat images from the Ad-roar-able lion stamp set and then an additional image from the Happy Snappy Crocs stamp set to create my background. I stamped the images multiple times in black ink and then used my prismacolor colored pencils to bring the images to life!

I then used the Concord and 9th perfectly penned stamp set to stamp out the sentiment strip and then I glued it to my card panel. I then colored one of the elephant images from the Elephant of Surprise stamp set and glued it on top of the sentiment strip to finish off the card!

Thanks for stopping by!
Kelly

Sneak Peek + Favorite Coloring Tools

It's Friday, y'all!!! Do a happy dance!


Today I'm sharing a sneak peek of my card that will be up on the Butterfly Reflections, Ink Blog tomorrow, and I'd also like to chat about my favorite coloring media.


While I am no expert at ANY of the techniques I use with these coloring tools, I'll offer some reviews of different products and compare them with each other. I hope to do a separate post for each medium so I can discuss the finer details of these tools in greater length.

Before I dive into that though, hang with me while I make two important observations:
1. Paper is important! The type of paper you use with these products makes a big difference in the finished product. Experiment with different types of paper and take photos of your projects so you can see the difference.
2. Swatch it! Regardless of how many products you have, do yourself a favor and create a swatch book of some kind. I highly recommend Jennifer McGuire's ink swatch downloads. While I won't be talking about inks in today's post, she has editable versions that you can make to reflect whatever coloring product you're using. Find them here.

1. Distress Inks

Distress inks are a Tim Holtz product and they have some awesome properties. They react with water, so they are a great tool for watercoloring. I don't recommend stamping with these inks because it's difficult to get a solid image. These inks are also great for ink blending techniques when using some kind of ink blending tool. I personally use the mini ink blending tool that's also made by Tim Holtz. The small round foam discs can get into small spaces easily and they fit perfectly underneath the mini ink cubes. Find the ink blending tool here and the ink pads here.
Speaking of the ink cubes, I actually don't own many of the large ink pads. Instead I have lots more of the mini ink cubes. The only color that I would recommend getting the full ink pad in is the Antique Linen. I use my full size Antique Linen ink pad for all of my no-line watercoloring techniques. It's easier to get a better stamped image with the full ink pad, but because I usually am using these inks for painting and ink blending, it doesn't matter if I have the full pad or the mini. The mini ink pads are also at a better price point since several local craft stores sell them in sets of 4. 

2. Zig Clean Color Real Brush Markers


These markers are also great tools for watercoloring because they react with water as well. They have a real brush tip that moves like a paintbrush. If you're into hand-lettering, then these are a great tool to have! I love the vibrant colors of these pens, and they blend SO well (if you have the right paper!). You can also touch the tip of one pen to another to get a custom blend of color for your project. Find them here.

3. Colored Pencils


So, there are a LOT of different brand of colored pencils out there. To be honest. I have only tried Prismacolor, but that is mostly because I am so happy with them and haven't felt a need to invest in anything else! These pencils blend together amazingly well and have such a buttery texture that it's hard to be unhappy with their performance. I recommend getting the Prismacolor Blender pencil as well because using that little guy will help you make the magic happen! Find the pencil sets here (for an amazingly good price right now!) and the separate blending pencil here.

I also use Distress Markers, Copic Markers, and other watercolor media, (currently LOVING this one), but the three I just mentioned are the ones I reach for most often. 

I hope to do a separate post on each of these media and the types of paper that work well with all of them, but in the meantime--thanks for stopping by and have a wonderful day!  

Kelly